SWELL by Vandy Vape

The TOTAL Mod?

RINCOE MechMan 228

BOX for RAMBO?

VooPoo X217

HOT SHOTS (of juice)

What 18650 battery for electronic mod?

Useful capacity of 18650 batts in electronic mod

Aegis SOLO

Geek Vape in GOOD SHAPE!

Friday, 24 July 2015

iPV 4 100W

 iPV 4 100W TC by Pioneer4you


1. The FINISH.

It is ... ordinary. It is free from major drawbacks but, at the same time, it is quite far from e.g. SnowWolf or SXmini. Fortunately after picking the iPV up we completely forget about it because the iPV4 is EXTREMELY ergonomic. At least as SXmini. Box firmly fits into a hand, finger goes straight to the fire button and the battery door is covered by pleasant to touch material.
If we look at battery door:


we can see there is no magnets. Instead we have "balls" on the body which have to "click" into a door holes. So, as you may have guessed, we get some loose - the cover moves within about 0.5mm. For me it is no problem but in general it may irritate.

The 510 head is very solid:

with plus pin on the spring - so each tested atomizer worked with no any problems.

Bottom is standard:


Vent-holes + microUSB socket, ONLY for firmware upgrade. Charger socket is on the side wall:


Battery compartment is done very well:


with fixed bottom pins and top ones on the spring.

And finally the screen... If we look at the mirror above the display:


We will know what to expect... Yes, in outdoor, during sunny day we won’t see anything. The screen is ABSOLUTELY unreadable. Indoor is not much better. Only in not so bright room is better. Below is a raw picture shot during cloudy day indoor:


it is hardly readable.

NOTE 1. Screen brightness may be fix in simple way:


NOTE 2. The dark display issue does not concern the black-black version of iPV4 - there is no the "mirror" above the display.


2. FEATURES.
Here is very good:
* Chip: YIHI SX330 v4S
* Output Power: 7-100 Watts (up to 50J in TC mode)
* Output Voltage: 1.0-7.0 Volts
* Output Current: 35A
* Coil Resistance: 0.1-3.0 Ohms
* Temperature control
* Powered by 2x18650 batts.

For me it is more than enough, 95% of us should be satisfied...

The screen shows:
* battery status,
* power,
* coil resistance,
* voltage,
* temperature in TC mode (not currently measured but previously set).

The menu is very simple, only with switch off and mode (TC/VW) selection options. In TC mode we can choose additionally the temperature unit and limit. Chip also has a 5 memories for settings.


3. VOLTAGE SHAPE.

Measurements were done in my typical test set-up with ~0,5 ohm microcoil on MutationX atomizer and Tektronix TPS2012 oscilloscope.


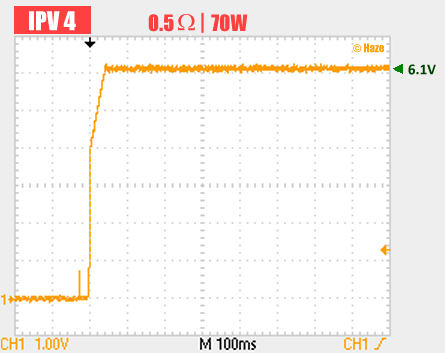


It is VERY WELL, stable smooth voltage.


4. EFFICIENCY.

Having the setup with 0.5 ohm coil we can also check if we get what we set. Below I compared:
* theoretical voltage what should be on the coil for a given power (calculated according to the P=U^2/R formula),
* real voltage MEASURED on the atomizer pins by use of multimeter.


No comment... Everything is perfect, mod as usual adds a little more voltage than is needed ;-).


5. TEMPERATURE CONTROL

Is described here.
Nothing to be crazy about :-) pretty regular.


6. SUMMARY

Is not easy... Let's look what I've tested before: Dicodes, SXmini, Snow Wolf. First two are beyond the competition - because of twice higher price. They are better finished but, at the same time, are powered by only 1x18650 and have less power. Thus the Snow Wolf stays on the battlefield :-) Its price is higher, but also finish is better and power is higher. Unfortunately, it also has a very annoying feature (for me): when it is not in use it enters lock mode after about 10 minutes, and I have to press the fire button 5 times before I get a puff. For others it may be just a trifle - if so, take a Snow Wolf. I'm staying with iPV4 :-)


What I LIKED?
* ergonomics,
* shape of the output voltage,
* simple menu.

What I DISLIKED?
* dark display (may be fix),
* a little loose battery door.

-------------

ANNEX - Firmware Upgrade

Pioneer4you released the firmware upgrade for iPV4 with new features:
* max output power: 120W
* max power in TC: 100J
* Titanium wires handling.

To install it you have to:
1. Download new firmware,
2. Download software for upgrading and install it (don't run it),
3. Remove the batteries from iPV4. Upgrade won't run if you don't do it.
4. Connect iPV4 by regular microUSB cable. After a few seconds you should see a "New device installation" window. The process can take 1-2 min. in Win8.1, and then window will just disappear.


5. Run the YiHi Program:


6. Click [Connection] -> [Install Driver] -> [Start ...... Windows] and you will see:


7. Click [Install Driver] and after that click [Connect] button - you should see "Device connected" message:


8. Then return to main menu and click [Upgrade].
9. Click [Open File] and select the update file. Then click Upgrade. 
10. Process takes about 20 s, and after that we have new features :-) :


Saturday, 27 June 2015

Resistance measurements - facts and myths

Again and again we see the questions such like "how many wraps shall I do to get a 1 ohm?". Often the answer is "buy a multimeter" and then sometimes somebody answer "there is NO WAY to measure such low coil resistance by use of regular, cheap multimeter!". Is it true? Let's see...

I wrapped some microcoil on the MutationX atomizer and will measure its resistance by use of several multimeters. Starting from expensive, calibrated meter by Keithley. But first...

Measuring the resistance by use of multimeter first we have to know (and take into account) resistance of the measuring system. 
(it means: resistance of probes/cables and internal resistance of meter)

We can do it in a very simple way: just performing a regular resistance measurement of shorted test probes:


As we can see the resistance of measuring system is 0.15 ohm. So it will be added to the each measured real resistance

Now let's see what about the atomizer:


OK, we get 0.75 ohm. Knowing that 0.15 ohm is from meter we can calculate that the resistance of the coil is 0.6 ohm.


Fine, but what with budget meters? Let's take something around 30$...

Cables first:


Here we get 0.4 ohm in bonus. And the atomizer:


So after deducting we somehow get also 0.6 ohm.


But wait a second... I also have the cheapest multimeter from FastTech, for about 10$.

Cables:


Atomizer:


Lets calculate... What is the result? Really? 0.6 ohm again!


Och! I have also SXmini at hand:


And we also get 0.6 ohm (after rounding)!

So we shouldn't look for problems where there are none!
 Today's electronics is such advanced that even multimeter for 10$ will be able to measure our atomizers with accuracy of 0.1 ohm - this is not rocket-science.

Of course there are limits - the main is resistance of measuring system: it is not proper to measure object whose resistance is lower than the resistance of the measuring system :-) So my deliberations are dedicated to resistance above 0.4 ohm (this is typical resistance of cheaper multimeters).

Friday, 12 June 2015

DANI Extreme v2 by DICODES

DANI Extreme v2 was released by Dicodes together with 2380 mod (actually 1-2 weeks earlier). And they are twins. 2380 is is a little bigger and more powerful but the rest of technical specification is the same. I described the 2380 firstly, but some features have been omitted (e.g. "heater protection" modes) so in this post I'd like to present the full, deep review of second version of DANI mod. Most of features (actually ALL) of Extreme v2 is the same like in 2380.


 1. The FINISH.

It's just PERFECT. Really perfect, with no cons. Everything is matched perfect, and perfectly finished. The mod is 22mm monolith without frills.


 2. FEATURES.

Here is quite good:
* power: 5-40W,
* coil resistance: 0,2 - 3,5 ohm,
* coil temperature control,
* "hot-start" modes,
* "heater protection" modes,
* vaping statistics.

For me it is very good, only cloud-chasing-lovers may need more power...

As well as 2380 OLED displays (after the puff):


* battery status,
* power,
* coil resistance.

The menu is one-button operated, with a memory of last selected function (you don't have to go through a whole menu to run last selected item).
New and nice option is vaping/battery statistics. We can check:
* number of puffs,
* vaping time,
* energy taken from battery,
* battery capacitance.

The 510 head is very solid:


But WITH NO SPRING ON PLUS PIN (and without any other adjustment) - so for some atomizers we get a gap:


I know that it is annoying to some users...


3. VOLTAGE SHAPE.


Measurements were done in my typical test set-up with 1 ohm microcoil on MutationX atomizer and Tektronix TPS2012 oscilloscope.


It is VERY WELL, better than in most other VW mods, because the voltage rises very smoothly. Just PERFECT!

4. EFFICIENCY.

Having the setup with 1 ohm coil we can also check if we get what we set. Below I compared:
* theoretical voltage what should be on the coil for a given power (calculated according to the P=U^2/R formula),
* real voltage MEASURED on the atomizer pins by use of multimeter.
 

No comment... Everything is perfect, mod as usual adds a little more voltage than is needed ;-)


5. TEMPERATURE CONTROL

Is described here: The Professor 


6. HEATER PROTECTION

Quoting manual:
The heater protection is a periodic interruption of the power applied to the coil [...] it helps to avoid a break in liquid flow and thus an increase of temeperature.

Hmm, well, let's see some examples:


We have 10 modes of heater protection of different duration and the repetition rate.


7. POWER BOOST

Feature known from others mods. We get a 10 modes of boosting. Let's see couple of them:


As we can see the Extreme adds about 40-50% of voltage with varying duration. Please note starting mode 4 the boost is periodic - this feature is UNIQUE.

8. SUMMARY


At this moment there is no better electronic TUBE mod than Extreme v2 and 2380. And it will be difficult to come up with something better :-) The ONLY con of the Extreme2 is lack of plus-pin adjustment. Of course its power output is double lower than 2380, but the price is also much lower. So if you don't need power over 40W take the Extreme2 with no hesitation!

Monday, 8 June 2015

What the PWM is?

Do you know the Vamo? Or other "budget" mods? For sure yes...
If we look at the voltage shape of such mods we will see something like that:


For comparison, let's look at the ProVari voltage shape:


So, looking at the PV voltage shape everything is OK - the voltage is smooth, stable at 4V, and that's it. But what is going on with the Vamo? Why the voltage reaches 6V and oscillates to zero volt?

This is how the PWM works. PWM means the Pulse-Width Modulation which actually is a modulated square wave with 3 basic parameters:
* voltage - amplitude of square wave,
* clock cycle - frequency of square wave,
* duty cycle - the percentage of the positive state compared to the period of the signal.

I tried to show them below:


 As we can see the most important parameter for us is DUTY CYCLE because it has a direct impact on resultant voltage of mod. In other words the area under the positive state of wave determines the "total" voltage. In case of square wave we can calculate it in very easy way: multiplying the voltage by percent of the fill (as shown in picture).

But what if we have more complex signal? Not regular square wave? In this case we have to use RMS value:

The root mean square (abbreviated RMS or rms) is the square root of the arithmetic mean of the squares of the values, or the square of the function that defines the continuous waveform.
WIKIPEDIA
It sounds complicated but really isn't. We have to sample the signal within a given period of time and just "averaged" it. By use the square root of the arithmetic mean of the squares, blah blah blah :-) It would be better to show it in practice:


As we can see in both pictures the main conclusion is that in the case of modulated signals is usually a BIG difference between the maximum and REAL value of effective voltage generated by mod.


What I tried to show I hope clearly ;-)

Wednesday, 3 June 2015

Snow Wolf 200W - May the FORCE be with Us

At this time we have the MONSTER - Snow WOLF 200W:


1. The FINISH.

Hmmm ... the first thing comes to mind after looking at the Wolf is ... iPhone :-) The aluminum, the "mirror" on the walls, and generally its elegance is such Apple products:


One will like it, others probably not, as usual - a matter of taste. I like it.

After taking into hand feeling changes a bit because ergonomics is still very good, but the impression is dominated primarily by WEIGHT - the 230g (specified in manual) should be quickly forgotten, because when you insert two 18650 batt's and atomizer the weight will approach to 0.5 kilogram! So the WOLF is rather NOT for outside.

The rest is PERFECT. The flap is hold on two solid magnets and there is no way to move it during normal use. 510 socket without complaint - all the atomizers I used worked with no problems:


On the bottom we can see safe holes and the jog for easy removal of the flap:


The interior looks like this:


Very nice ...


2. FEATURES
The most important parameters:
* Power: 5-200W,
* Coil resistance: 0.05 - 2.5 ohm,
* Temperature control,
* Powered by 2x18650.

And that's it, even extreme vapers should be satisfied.

The display is quite typical and shows:
- Estimated battery status,
- The power,
- Voltage,
- Resistance.
- Temperature.

The arrangement of these indications is constant, regardless of the mod operation - so if we have a regular Kanthal wire we have to watch useless temperature indicator. It may be a little misleading.

The operation is VERY simple, the menu does not exist, we have FIRE and UP/DOWN buttons, which change the power and temperature. The only additional option is switching between these parameters by simultaneously pressing the up and down buttons.
For some it may be too simplistic.


3. VOLTAGE SHAPE.

My regular measuring system with dual mc on MutationX atomizer. The resistance was 0.2 ohms to reach the maximum power:


Well, this is the POWER. 150 watts without any bullshit, and very stable, EXCELLENT ...

But why we stopped at 150W? Hmm, because the manufacturer wrote:

When wattage is higher than 150W, the system is pulse output and the upper right corner of the screen will display a "P" symbol
In practice, it looks like this:


 A live like this:


And this is not so good :( Because THERE IS NO WAY TO ACHIEVE THE REAL POWER EXCEEDING 150W - the modulation drastically reduces the voltage RMS and in my opinion (for example) at 140W (with no modulation) we get a bigger cloud than at modulated 180W.


4. EFFICIENCY.

Having the setup with about 0.2 ohm coil we can also check if we get what we set. Below I compared:
* theoretical voltage what should be on the coil for a given power (calculated according to the P=U^2/R formula),
* real voltage MEASURED on the atomizer pins by use of multimeter.


No comment... Everything is perfect, mod as usual adds a little more voltage than is needed ;-)


5. TEMPERATURE CONTROL

The result of temperature control I showed here: http://vape-safe.blogspot.com/2015/05/the-whole-truth-about-temperature.html


6. CONCLUSION


It would be difficult if the Wolf costs 300USD ;-) BUT IT COSTS 150USD !!! So, no doubt it - at a price of Sigelei 100W we get the real 150W + temperature control + perfect finish.


What I LIKE?

* The finish and ergonomics,
* The shape of the output voltage,
* Menu (its simplicity)
* BIG power under the hood :-),
* Clear display.

What I DON'T like?
* The finish ;-) (these "mirror" sideways look good only if you do not touch it)
* Menu ;-) (lack of it)
* Slightly exaggerated output power above 150W.


Curiosity

First time I saw it - on standby Wolf put the 1-volt pulses every 3 seconds, apparently controlling the atomizer. That's how it looks:


Regards!

-----------

20.06.2015 UPDATE - With kanthal wire the Snow Wolf works in a little strange way - I showed it in the movie below: