iPV 4 100W TC by Pioneer4you

1. The FINISH.
It is ... ordinary. It is free from major drawbacks but, at the same time, it is quite far from e.g. SnowWolf or SXmini. Fortunately after picking the iPV up we completely forget about it because the iPV4 is EXTREMELY ergonomic. At least as SXmini. Box firmly fits into a hand, finger goes straight to the fire button and the battery door is covered by pleasant to touch material.
If we look at battery door:

we can see there is no magnets. Instead we have "balls" on the body which have to "click" into a door holes. So, as you may have guessed, we get some loose - the cover moves within about 0.5mm. For me it is no problem but in general it may irritate.
The 510 head is very solid:

Bottom is standard:

Vent-holes + microUSB socket, ONLY for firmware upgrade. Charger socket is on the side wall:

Battery compartment is done very well:

with fixed bottom pins and top ones on the spring.
And finally the screen... If we look at the mirror above the display:

We will know what to expect... Yes, in outdoor, during sunny day we won’t see anything. The screen is ABSOLUTELY unreadable. Indoor is not much better. Only in not so bright room is better. Below is a raw picture shot during cloudy day indoor:

it is hardly readable.
NOTE 1. Screen brightness may be fix in simple way:
NOTE 2. The dark display issue does not concern the black-black version of iPV4 - there is no the "mirror" above the display.
2. FEATURES.
Here is very good:
* Chip: YIHI SX330 v4S
* Output Power: 7-100 Watts (up to 50J in TC mode)
* Output Voltage: 1.0-7.0 Volts
* Output Current: 35A
* Coil Resistance: 0.1-3.0 Ohms
* Temperature control
* Powered by 2x18650 batts.
For me it is more than enough, 95% of us should be satisfied...
The screen shows:
* battery status,
* power,
* coil resistance,
* voltage,
* temperature in TC mode (not currently measured but previously set).
The menu is very simple, only with switch off and mode (TC/VW) selection options. In TC mode we can choose additionally the temperature unit and limit. Chip also has a 5 memories for settings.
3. VOLTAGE SHAPE.
Measurements were done in my typical test set-up with ~0,5 ohm microcoil on MutationX atomizer and Tektronix TPS2012 oscilloscope.


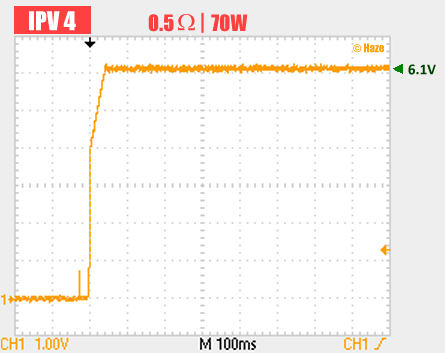

It is VERY WELL, stable smooth voltage.
4. EFFICIENCY.
Having the setup with 0.5 ohm coil we can also check if we get what we set. Below I compared:
* theoretical voltage what should be on the coil for a given power (calculated according to the P=U^2/R formula),
* real voltage MEASURED on the atomizer pins by use of multimeter.

No comment... Everything is perfect, mod as usual adds a little more voltage than is needed ;-).
5. TEMPERATURE CONTROL
Is described here.
Nothing to be crazy about :-) pretty regular.
6. SUMMARY
Is not easy... Let's look what I've tested before: Dicodes, SXmini, Snow Wolf. First two are beyond the competition - because of twice higher price. They are better finished but, at the same time, are powered by only 1x18650 and have less power. Thus the Snow Wolf stays on the battlefield :-) Its price is higher, but also finish is better and power is higher. Unfortunately, it also has a very annoying feature (for me): when it is not in use it enters lock mode after about 10 minutes, and I have to press the fire button 5 times before I get a puff. For others it may be just a trifle - if so, take a Snow Wolf. I'm staying with iPV4 :-)
What I LIKED?
* ergonomics,
* shape of the output voltage,
* simple menu.
What I DISLIKED?
* dark display (may be fix),
* a little loose battery door.
-------------
ANNEX - Firmware Upgrade
Pioneer4you released the firmware upgrade for iPV4 with new features:
* max output power: 120W
* max power in TC: 100J
* Titanium wires handling.
To install it you have to:
1. Download new firmware,
2. Download software for upgrading and install it (don't run it),
3. Remove the batteries from iPV4. Upgrade won't run if you don't do it.
4. Connect iPV4 by regular microUSB cable. After a few seconds you should see a "New device installation" window. The process can take 1-2 min. in Win8.1, and then window will just disappear.

5. Run the YiHi Program:

6. Click [Connection] -> [Install Driver] -> [Start ...... Windows] and you will see:


8. Then return to main menu and click [Upgrade].
9. Click [Open File] and select the update file. Then click Upgrade.
10. Process takes about 20 s, and after that we have new features :-) :


A very awesome blog post. We are really grateful for your blog post. You will find a lot of approaches after visiting your post. Online vape products
ReplyDeleteA very awesome blog post. We are really grateful for your blog post. You will find a lot of approaches after visiting your post. Convection vaporizer
ReplyDeleteI think this is an informative post and it is very useful and knowledgeable. therefore, I would like to thank you for the efforts you have made in writing this article. puff co peak pro
ReplyDelete